5Using MIB Designer
After starting MIB Designer the left (tree) window will contain the last edited (and saved) MIB module. If there is no such module you will be asked to create one with the MIB creation wizard.
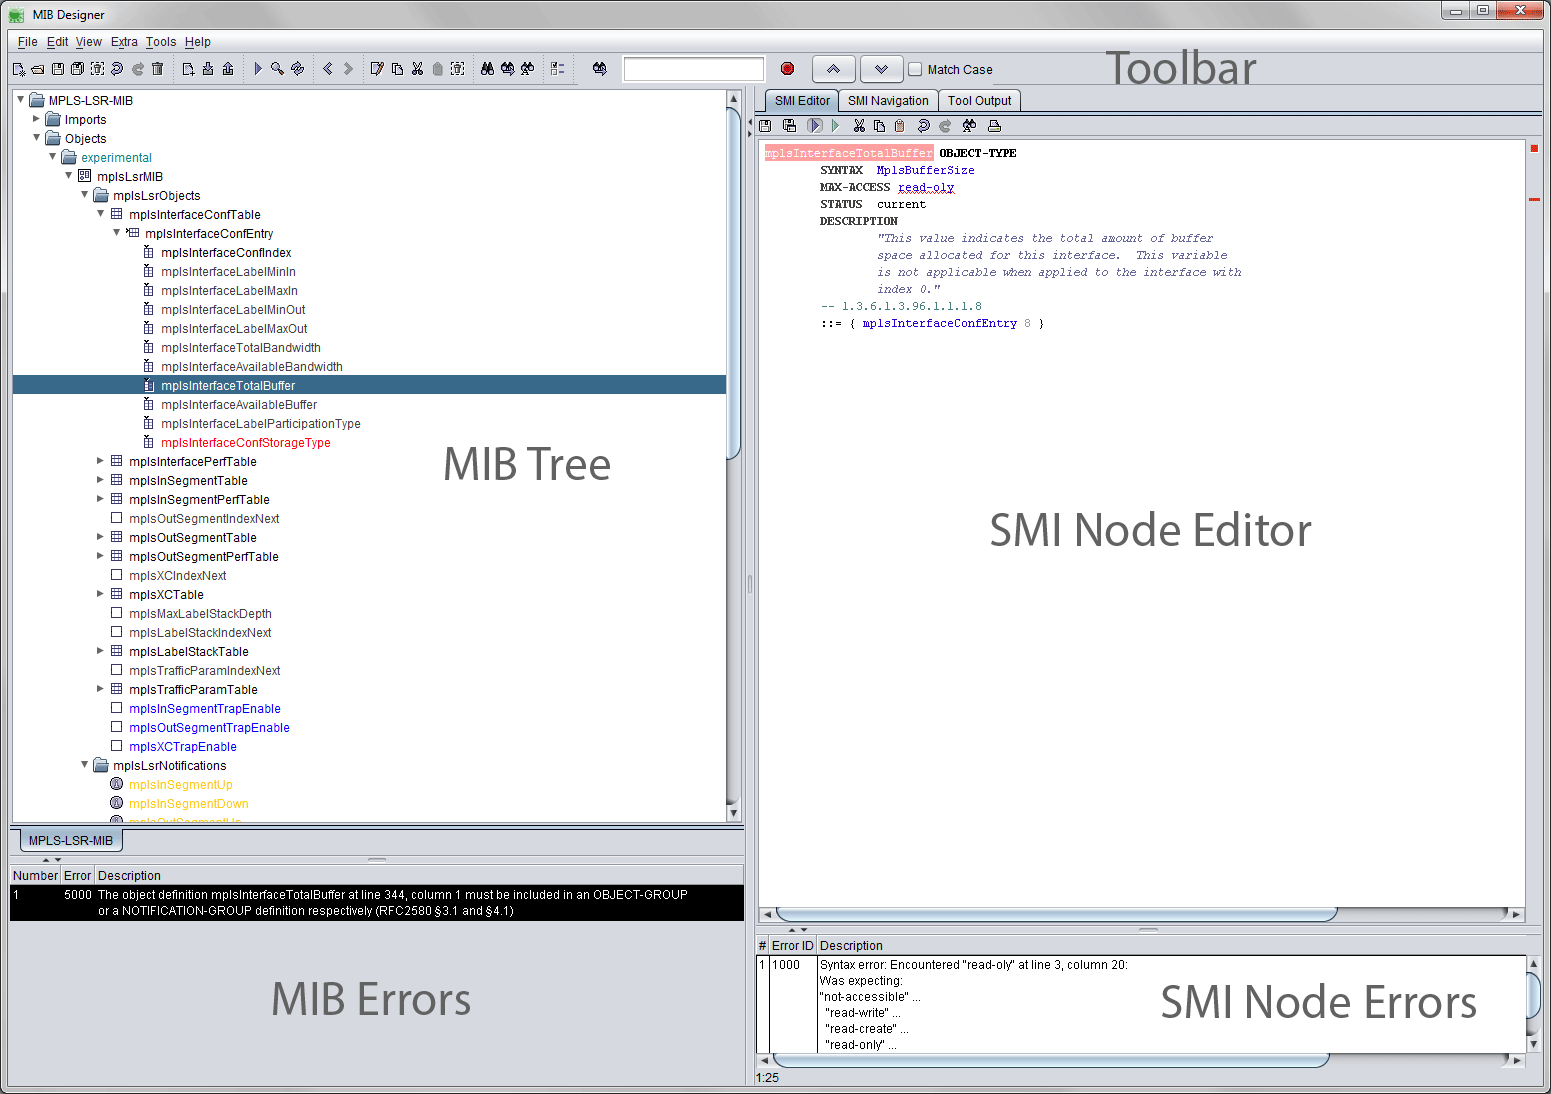
The panel on the right side is divided into the SMI (object) editor and a read-only preview and navigation panel:
The syntax completion is available in the SMI Editor and the MIB File editor. See “Auto Syntax Completion” on page 43.
4SMI Editor - The SMI object editor shows the SMI definition of the current node under the Objects and Textual-Conventions root nodes. For objects other than a MODULE-IDENTITY construct, the SMI editor can be used to directly edit the objects definition. By pressing <Ctrl>-<Space> SMI syntax completion tries to complete the SMI text. If there is only a single valid completion, then the token (if any) at the cursor position will be replaced by the completion. If there are several completions, a popup dialog appears to select the appropriate completion by pressing <Enter> or double clicking on the item to use for completion. If there is no completion, then no changes to the text will be done. To cancel the completion dialog press <ESC>.
4SMI Preview/Navigation - The preview and navigation panel provides a SMI preview of the selected node. In contrast to the editor, the preview SMI panel contains additional navigation comments for easy navigation through the MIB tree using hyper links. Comparison results are also displayed in this panel. For more information about MIB module comparison see “MIB Comparison” on page 58.
The following sections describe which steps are necessary to create a new SMIv2 MIB module (“Creating a New MIB” on page 12) and how MIB Designer’s object editing dialogs can be used to edit such a MIB module (“Editing a MIB” on page 15).
Figure 5:MIB Designer’s main window.
In order to create a new MIB module select File>New ( ) from the main menu. A three step wizard opens. By following the wizard step-by-step, a new MIB module can be easily created - including a top level object structure and a basic set of object groups.
Before the wizard opens you will be asked to save unsaved changes. You should do so, to ensure that the verification of the MIB module object identifier after finishing the wizard finds up-to-date OID information in the MIB repository.
The New MIB Wizard is described in detail by the following section “New MIB Wizard”. If you cancel the wizard then a minimal new MIB module with the name NEW-SNMP-MIB will be created.
The following steps have to be performed only if the wizard has been canceled, before the newly created module can be saved:
1.Edit the module’s name by selecting the tree’s root node, opening the tree’s context menu by pressing the right mouse button and selecting Edit.
2.Import any object identifiers and textual-conventions you wish to use with the new module from other MIB modules by choosing Edit>Imports… from the main menu. For details on the Imports menu see subsection “Import” on page 16. The imported MIB objects will then appear in the MIB tree under the Objects and the Textual-Conventions node.
3.Add any object identifiers or object identities that need to be defined above your module identity node. A SMIv2 MIB must define a module identity node exactly once. Object identifiers and object identities are added by selecting Add>Object Identifier or Add>Object-Identity from a node’s context menu, respectively.
4.Add a module identity node by selecting Add>Module-Identity from the context menu of the node under which you want to define it.
The wizard for new MIB (and PIB) modules has three steps:
1.Specify the name of the new MIB module and a common prefix for object names of this MIB module and whether the new module should be a SNMP MIB or a non-SNMP PIB module.
2.Specify the root object identifier for the new MIB module.
3.Specify whether a default object structure and basic object groups should be created by the wizard.
Step 1
The prefix for all new object names created for this MIB module is defined by the with the Common Object Name Prefix. The object name prefix must start with a lower case letter (typically a lower case word) and must not contain hyphens or spaces.
You can change the prefix for a MIB module later by editing the MIB Designer configuration file located in your user directory: Search for the line that starts with DefaultObjectName. and the MIB module name for which you want to modify the default prefix: DefaultObjectName.<MODULE-NAME>=<prefix>.
Then simply replace the <prefix> text with the new object name prefix you want to set and save the text file.
The name of the module is specified with the New MIB Module Name field content. The module name must contain upper case letters and the hyphen (-) character only.
By checking the Create a Policy Information Base (PIB) module box, MIB Designer will create a PIB module instead of a SNMP MIB module. If you want to create MIBs for SNMP, you should leave the box unchecked.
When defining a new MIB module, the second step, after creating a name for it, is to define a root object identifier (OID). There is typically only a single root OID for a MIB module, but that is not mandatory. Additional root objects can be added later using the Edit/Imports menu.
A possible root OID for an enterprise specific MIB module is the enterprises ID assigned by IANA (http://www.iana.org) or any OID defined in a subtree of that OID by an enterprise specific registration MIB module.
When creating a registration MIB module, then import the enterprises OID and assign your IANA ID in the spin field left of the respective check box.
Otherwise, choose an OID from another MIB module (Select MIB to import root OID from), which can be imported optionally from an external MIB file.
Use an unique sub-identifier to avoid duplicate registrations which causes severe problems at runtime which could render your product unusable!
MIB Designer will check uniqueness with the current MIB repository when you finish the wizard. If the OID (including the given sub-identifier) you have chosen is already defined elsewhere, then you will be warned to you can return to this step.
Step 3
With this step, a basic structure could be created that is needed by typical MIB modules. Any MIB objects created by this wizard step can be easily removed from the MIB module if not actually needed (any more). Therefore it is recommend the use the default: create all structure objects.
|
4Top Level MIB Structure
This option will create the top level structure including all the object identifier nodes shown by Figure 6.
4Create Basic Object Groups
This option will create an object and a notification group definition. Both are initially empty, which is not allowed for such groups by the SMIv2 standard. Therefore, a syntax error is displayed when the MIB has been checked for errors.
By confirming the wizard with the Finish button, MIB Designer will search the MIB repository for object identifier registrations that conflict with the new MIB module‘s object identifier. If such a conflict is detected you will be asked whether you really want to create the MIB module now. If you choose No, the wizard will open again and you can modify the selected root OID (or the suffix ID) in “Step 2” and try again.
With MIB Designer MIB objects can be added, edited, copied, cut, pasted and removed. These functions can be accessed through a node’s context menu or through the Edit menu. Undo ( ) and redo (
 ) of edit operations is available for the last 50 actions.
Depending on the type of the node (i.e., whether it is an OBJECT-TYPE, OBJECT IDENTIFIER, etc.) some of the menu items may be disabled. If the MIB object, for example, is an OBJECT-TYPE then the Add menu will be disabled, because SMI does not allow defining an object below an OBJECT-TYPE definition. All menu items of the context menu, apart from Add, have also counter parts on the tool bar (


 ).
).
With a Drag&Drop mouse operation, Cut&Paste or Copy&Paste can be performed by a single mouse click. The default drag action is ‘move’ which cuts the entire sub-tree rooted at the selected node and pastes that sub-tree as a new (last) child under the target node.
By pressing <Ctrl> while selecting the node to be dragged, the drag action can be changed to ‘copy’. It copies a selected leaf node or sub-tree. A copy of the dragged node (and its sub-tree) is then inserted as a new (last) child of the target node. Please refer to sections “Copy”, Cut, and “Paste” on page 18 for further details on cut, copy, and paste.
The object ID of any MIB object that is a descendant of the Objects node can be dragged to any external application capable of text or string dropping.
Before an object from another MIB module can be used or referenced in a module it must be imported. Objects are imported using the Edit>Imports… menu item (alternatively: <Ctrl-Alt-I> or Import… from the node context menu) or via the Search MIB Repository dialog (see “Search MIB Repository for Importing Objects” on page 39). Choosing Edit>Imports opens the Imports window which is shown by Figure 1.
To import an object definition or ASN.1 macro from a MIB module:
1.Select the MIB module that defines the object definition from the Source MIB Module list. If you are unsure where the object is defined, use the Search MIB Repository function to look it up.
2.With the Add or Add All buttons, you can select the object to be included in the MIB modules IMPORT clause.
To remove an object definition or ASN.1 macro from a MIB module:
1.Select the MIB module node under the Imports node in the MIB tree from which the definition has been imported.
2.Select Edit from the context menu.
3.Select the object definition to be removed in the right table (named “Imported”) and press the Remove button. If the button is disabled then the MIB module has still references to this node. You will then have to remove those references before you can remove the import.
Caution: When SMI macros are imported automatically, unnecessary MACRO imports will be removed from the imports clause and MACRO imports will be grouped at the bottom of each import source statement!
By activating the option “Automatically import SMI macros” in Edit>Preferences, MIB Designer automatically imports all SMI macros necessary for the current module whenever the module is checked by View>Check. When activated this is also done automatically when saving a module.
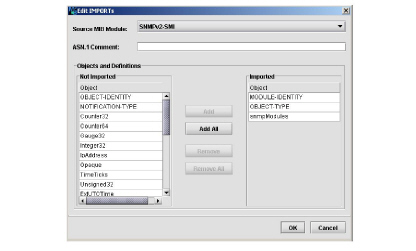
Figure 7:Imports window
To add a MIB object to the current module, select the object under which you want to create the new object and choose Add from the Edit menu. Alternatively, you may choose Add from the context menu. The new object is created as the last child of the selected node. The new object has a default name and an automatically assigned object ID. Further details on editing MIB objects and an overview of all possible MIB objects and their editor windows can be found in section “Moving Objects” on page 19.
MIB objects are copied to an internal clipboard which is not shared with other applications.
A MIB object (and its sub-tree) is copied to the internal clipboard by selecting the corresponding node within the MIB tree and pressing <Ctrl-C> (alternatively:  , Edit>Copy, or Copy from node context menu). The copy is identical to the original nodes except for the object names. The copy’s object names are changed to ‘<original_name>n’, where n is the number of the copy starting from 0. Its object ID and those of all objects in the copied sub-tree are adapted when the object is being pasted. When the sub-tree contains a MODULE-IDENTITY construct, then this object will be transformed to an OBJECT-IDENTIFIER in the copy, because a MIB module must contain exactly one MODULE-IDENTITY.
Whenever a node is copied to the internal clipboard, its OID is copied to the system clipboard. Thus, copying a node can be used to export the OID of an object as a string to an external application. Because textual-conventions do not have an OID their object name is copied instead. Please note that when copying/cutting a sub-tree only the OID of its root node is copied to the system clipboard.
A sub-tree or a single MIB object is cut to the clipboard by selecting the root node of the sub-tree or by selecting a leaf node, respectively and then pressing <Ctrl-X> (alternatively:  , Edit>Cut, or Cut from node context menu). A cut sub-tree can be pasted more than once, provided that it does not contain a MODULE IDENTITY node.
A cut sub-tree, or any cut MIB object other than a TEXTUAL-CONVENTION, can be pasted to OBJECT IDENTIFIERS (nodes), OBJECT IDENTITIES, and MODULE IDENTITIES only. If the cut object is a TEXTUAL-CONVENTION it can be pasted to the Textual-conventions node only.
A sub-tree or a single object cut or copied to the clip-board, can be inserted beneath a selected node by pressing <Ctrl-V> ( , Edit>Paste, or Paste from node context menu). If an object name of any of the pasted objects is already used within the module then it will be renamed by appending 0 to its name. If its name ends on a number the number will be incremented by one. The OID of the pasted node (sub-tree) is changed to the next available OID after the last child’s OID.
The prefix of the object ID is given by the parent node and therefore fixed. The OID’s suffix however, can be given by one or more dot separated sub-identifiers (unsigned numbers).
A selected node is edited by pressing <Ctrl>-E ( , Edit>Edit, or Edit from node context menu). The editor windows vary from object type to object type, but common to all windows is the Object Definition group. Here the object’s name, ID, status, description and an optional reference can be edited. Please note that depending on the edited object some of the above listed fields may be disabled. Textual conventions, for example, do not have an object ID. Module identities do not have a status.
Changes to the edited object are not committed until the user closes the editor window by pressing its Save button. When saving the changes, the object’s ID and the name are checked for being valid and not ambiguously defined within the current MIB module. In the case of an invalid object ID or name, an error dialog is shown and the user may then correct the invalid ID or name.
In addition to editing a SMI object through editor dialogs, unreleased SMI objects can also be edited directly by using the SMI editor (see “Editing a MIB” on page 15). Within the editor you can enter the SMI specification of the selected node in the MIB tree. Only valid SMI syntax may be saved into the tree by either selecting another node or pressing <Alt>-S. MIB Designer allows to save a node even if the change renders the whole MIB module invalid. Thus, it is recommended to check the whole MIB module by pressing <Alt>-C after all changes have been made to a MIB module.
If the leading hyphens are left out then they will be added by MIB Designer.
For each node ASN.1 comments can be entered or edited respectively. A comment can be placed at the top of each node or inline before the object identifier assignment1.
To edit a comment, choose ASN.1 Comments from the context menu and then select either Edit Top Comment or Edit Inline Comment. Each entered comment line must start with two consecutive hyphens as long as the line is not empty. The next sequence of two consecutive hyphens would end the ASN.1 comment. But in most cases this is not desirable, so it is wise to avoid them.
If a MIB module is exported with activated „generate MIB Designer comments“ option (see “General” on page 73) and reimported afterwards then the generated OID comments appear as inline comments. While exporting the module another time, MIB Designer detects that the comment is already there and will not regenerate it.
ASN.1 comments should be used rarely, because most MIB browsers are not able to show such comments. Thus, any information that is needed to understand a MIB object or module should be described in its DESCRIPTION attribute.
The built-in spell checker marks incorrectly spelled words on the fly by a dashed line. To correct a word, a context menu with up to ten suggestions can be opened by pressing the right mouse button. If a user dictionary has been specified in the MIB Designer preferences (see “Spell Checking” on page 75) the context menu provides an Add button to add the selected word into the user dictionary or to always ignore it.
MIB objects other than textual conventions can be moved upwards or downwards on their tree level by using <Alt>-<Up> and <Alt>-<Down> respectively:
Press <Alt>-<Up> to move a node upwards in the tree.
1.Moving an object upwards, swaps the object identifier (OID) of the moved object with its preceding sibling. All OIDs of the objects registered in the sub-trees of the moved and the preceding object will be changed accordingly. To move an object upwards, choose Edit>Move>Up from the main menu or Move>Up from the object node’s context menu.
Press <Alt>-<Down> to move a node downwards in the MIB tree.
2.Moving an object downwards, swaps the object identifier (OID) of the moved object with its following sibling. All OIDs of the objects registered in the sub-trees of the moved and the following object will be changed accordingly. To move an object downwards, choose Edit>Move>Down from the main menu or Move>Down from the object node’s context menu.
An addition to MIB objects also import sources can be ordered by moving them up or down within the Imports node.
The child objects of a node can be renumbered using the OID increment set in preferences by using the Subtree>Renumber menu item of the context menu on the parent node. The child objects are then renumbered starting with one and each next sibbling child node’s last sub-identifier is assigned the last sub-identifier value of its predecessor plus the value of the OID increment setting (see “Defaults” on page 75). The descendant objects below each child are renumbered accordingly.
5.2.10MIB Object Editing Dialogs
All MIB editor windows are divided into groups that group the properties of the edited MIB object. The Object Definition group is common to all node editor windows and contains fields for defining the object that are:
Object Name
The Object Name field specifies the node’s name. The name must start with a lower case letter for all MIB objects except textual conventions. Textual conventions must start with an upper case letter. In any case, the name must be unique with the current MIB module.
When changing a name, all references to that name within the same MIB module will be changed accordingly. For example, if a name of an index column is changed, then the INDEX clause of the corresponding table as well as the OBJECTS clause of all OBJECT-GROUP definitions referencing that columnar object will be changed too.
A default object name for new objects can be specified in the preferences dialog of MIB Designer. It is recommended to use your companies name and an abbreviation of the product or purpose that uniquely identifies your set of MIB objects in order to avoid object name clashes with other MIB modules.
Object ID
The Object ID field specifies the object identifier assigned to the node. This property consists of a read-only field denoting the parents object name (OID prefix) and a changeable field for the node’s OID suffix. In most cases, this suffix is a single sub-identifier which may be any unsigned integer value between 0 and 232-1. In some cases it may be necessary to define a node without defining an object identifier for its direct parent, in particular when defining a module identity that is not the root node of a new MIB module.
When changing the OID suffix of a node, MIB Designer will not move the node to the assigned new location until the user refreshes the view ( ). This provides a more easy way of tracking changes.
Please note that the assigned OID must be unique for all nodes. Also it is allowed to define different names for the same OID by using an OBJECT IDENTIFIER construct, it is not wise to do so, because many tools available today cannot handle this correctly and there is no need for it. Because of these reasons MIB Designer does not allow defining more than one name for an OID.
Because registered OIDs must be globally unique, MIB Designer provides an easy way to check whether an OID is already assigned to any other MIB module (in the current MIB repository). By clicking on the Object ID button, the current MIB repository will be searched for any occurrence of the assigned OID for this object. If the edited MIB module has already been saved to the MIB repository, occurrences in that MIB module will also been shown, although it is normally save to ignore them.
Status
The status field specifies the validity of the object definition. If the field is disabled a status cannot be specified for the given node. The status is then assumed to be current. The possible values for SMIv2 modules are:
4current – The definition is valid.
4deprecated – The definition is valid in limited circumstances, but has been replaced by another. The new definition typically encompasses a wider scope, or has been changed for ease implementation.
4obsolete – The definition is not valid. It was found to be flawed; could not be implemented; was redundant or not useful; or was no longer relevant.
Reference
The reference field specifies the source of the definition. It may refer to a document from another standards organization, or an architectural for a proprietary system. Although only a single line is displayed at once, multiple lines can be entered. By pressing the Reference button a text editor will open which allows a more comfortable editing of the reference text.
Like the comment editor, text entered in the reference field is background checked by the built-in spell checker. Misspelled words are marked by a dashed red underline. Words can be corrected using a suggestion list of up to ten words by opening a context menu with the right mouse button.
Description
By holding down the <Ctrl> button while pressing the Description button, spell checking for the description field can be invoked directly from the object editor.
The description field provides a textual description of the object being defined. By pressing the Description button a text editor will open which allows a more comfortable editing of the description text. In addition, the edited text is background checked for spelling errors. Misspelled words are marked by a dashed red underline. Words can be corrected using a suggestion list of up to ten words by opening a context menu with the right mouse button.
Please note that the above descriptions for the common properties of all objects are not repeated in the following subsections which describe the special properties of the respective objects.
Changes made to an object definition will not take affect until the editor window is closed by pressing the <Save> button. If an editor window is closed via the <Cancel> button any changes made to the object will be discarded.
The OID value assignment construct OBJECT IDENTIFIER is used to assign an OID value to an identifier in the MIB module. It does assign an object name to an OID, thus the common object definition properties status, reference, and description as described in “Moving Objects” on page 19 are not available for an object identifier definition (see Figure 8). Only an identifier (the object name) and an object ID must be specified.
SMI allows assigning multiple names to a single OID. It does not allow registering an OID to multiple object definitions. The former is not recommended because there currently exist a lot of tools in the SNMP world that are not capable of handling ambiguous OID to object name mappings. MIB Designer will display a warning message when such an assignment is attempted. In case of a duplicate OID registration (done with one of the editors below), MIB Designer will display an error message and will not save the definition until the OID is changed to an unregistered one.
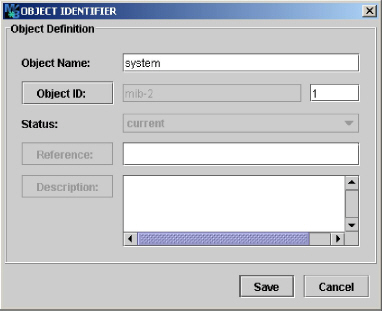
Figure 8:Object identifier editor window
In contrast to an OBJECT IDENTIFIER, an OBJECT-IDENTITY definition uniquely registers an OID value with an object name. A registration is a permanent assignment of an OID, which means that no other item may be registered with the same OID value.
An object identity definition supports all the properties listed in “Moving Objects” on page 19 and can be used to register an OID for an item. For example, a product, contact information for a sub-tree, or any other item which need not to be necessarily related to SNMP. The editor window for an object identity (Figure 9) looks similar to the object identifier window (Figure 8), except that the status, reference, and description fields are editable.
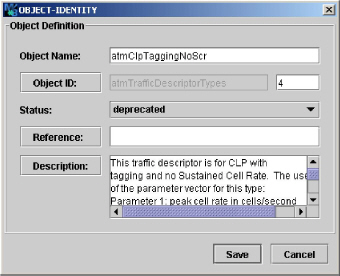
Figure 9:Object-Identity editor window.
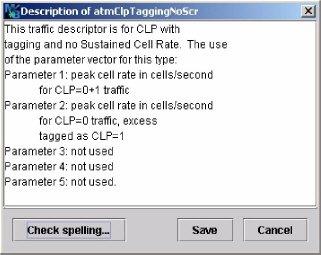
Figure 10:Text editor for a description field.
The MODULE IDENTITY construct is used to specify information about SMIv2 MIB modules. As any other object definition it consists of the Object Definition group described in “Moving Objects” on page 19 and a Module group whose fields are described below (see Figure 11). Please use the Description property to specify copyright and grant of use license when creating an enterprise specific MIB.
Specifies the last date and time the current module has been modified in the ExtUTCTime data type format. The format used is an extended subset of the UTC (coordinated universal time) time format from ASN.1. The format is [YY]YYMMDDHHmmZ where:
4[YY]YY is the 2 or 4 digit year (using 4 digits is required for years after 1999);
4MM is the month (01 through 12);
4DD is the day (01 through 31);
4HH is the hour (00 through 23);
4mm is the minute (00 through 59); and
4Z is the uppercase letter Z which denotes Greenwich Mean Time (GMT).
The value of the last-updated field property must be identical to the date and time from the first revision/description clause, if present. Thus, if there is at least one revision entered, this field will be updated automatically, otherwise it can be updated to the current date and time by pressing the Update button.
Organization
The organization field specifies the name of the organization that has authority over the definitions created in the current MIB module.
Contact
The contact field specifies contact points for technical information.
Revision/Description
The paired REVISION/DESCRIPTION clauses are optionally used to specify information about the creation and revision of the module in reverse chronological order. In order to add a revision, press the Add button. A new list entry will be added to the top of the list and the Last-Updated field will be updated too. The new revision is then edited by pressing the Edit button. The revision editor window allows freely editing the date and time of the revision and its description or editing the UTC time by a calendar popup dialog. The popup dialog is opened by clicking on the Revision button. With the Remove button one or more revisions can be removed from the list.
If revision control is activated (see section “Exporting MIBs to XML, HTML, XSD, PDF, and Text” on page 41) in the general preferences menu, then adding a new revision will lock all objects defined in the current MIB module, that have not been locked yet through a previous revision.
Removing the latest revision will unlock all associated objects, thus all objects that have been added since the preceding revision. Removing an intermediate revision will associate the locks of that revision with the subsequently revision.
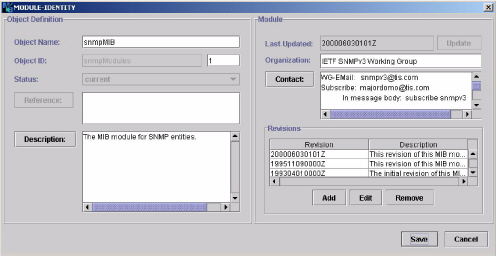
Figure 11:Module identity editor window.
Basic SMIv2 (SNMPv2/v3) data types are INTEGER, Integer32, Gauge32, Counter32, Counter64, Unsigned32, OBJECT IDENTIFIER, BITS, OCTET STRING, and Opaque.
TEXTUAL-CONVENTION definitions are used to create a new type. Since the basic data types supported by SNMP cannot be dynamically extended, new types can only be defined by adding constraints to an existing base type or a reduction in length of strings.
Although the textual-convention editor contains an Object Definition group (see Figure 12), the object name of a textual-convention must start with an upper case letter. The properties shown by the textual-convention specific group are described below.
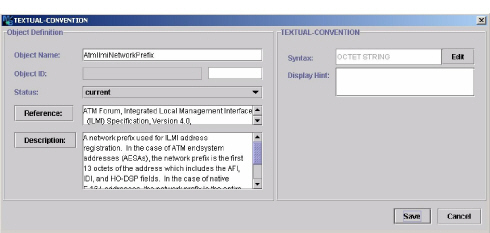
Figure 12:Textual-convention editor window
Syntax
The syntax field specifies the type of the syntax. The type string is shown in a read-only text field without showing possible enumeration or range values. The complete syntax definition is available by the field’s tool tip. The syntax definition can be edited by pressing the Edit button. The syntax editor dialog window appears where you can choose from all possible built-in syntax types, type assignments and textual-conventions that were imported or were defined in this MIB module.
Adding an object import from within the syntax editor has immediate effect although it can be undone after the MIB object editor is closed (regardless whether changes are saved or not).
If you want to use a type assignment (SMIv1) or textual convention (SMIv2) that is not already imported then you can use the Import button to select the definition and add it to the modules IMPORTS clause.
Additionally, the syntax editor window lets you specify valid string sizes and number ranges as well as enumerated values.
Using the context menu is recommended for multi-line comments.
When defining enumerated values, you may add associated ASN.1 comments by either using the Comment column of the comment’s context menu of the Enumeration table.
A scalar type cannot have ranges and enumerated values at the same time. Non-scalar types, for example OCTET STRING based types, can have size (“range”) restrictions only.
Display-Hint
The DISPLAY-HINT property, which need not be present, gives a hint as to how the value of an instance of an object with the syntax defined using this textual convention might be displayed. It can only be specified for types that are based on integer or octet string. Please refer to RFC 2579 section 3.1 for further details on the allowed formats.
The OBJECT-TYPE construct is used to specify definitions of columnar and scalar object types, which are also called leaf objects. The pairing of the identity of a leaf object (its OID) and the value to identify an instance of that leaf object is called an SNMP variable. SNMP variables are the operands and results of SNMP operations.
Figure 13 shows the Object-Type editor window, like any other object editor window it contains an Object Definition group and an Object-Type specific group.
Figure 13:Object-type editor window.
Syntax
Specifies the syntax of the object-type in the same manner as the syntax clause of a textual convention (see subsection “Textual-Convention” on page 26).
Max-Access
Specifies the maximum allowed access to the leaf object. Possible values are:
4not-accessible – The object-type is a column in a table used as an index (or an index part) and may not be used as an operand in any operation.
4accessible-for-notify – The object-type is special operand for event report operations.
4read-only – The object-type may be an operand in only retrieval and event report operations.
4read-write – The object-type may be an operand in modification, retrieval, and event report operations.
4read-create – The object-type may be operand in modification, retrieval, and event report operations. Additionally, it may be an operand in a modification operation creating a new instance of the object-type.
Default Value
Specifies an acceptable value which may be used when an instance of a row is created via an SNMP modification request and the object-types value is not initialized by that request. A default value cannot be specified for index objects of tables.
For enumerated and BITS syntaxes the default value have to be chosen from the available values by using the Choose button.
To remove the DEFVAL clause from an OBJECT-TYPE definition empty the default value field (for enumerated or BITS values use the Clear button of the default value selection dialog accessible through the Choose button).
Units
Specifies a textual description of the units associated with the data type.
Two OBJECT-TYPE constructs along with a SEQUENCE construct specify a definition for SMI table object. An SNMP table contains rows and columns. A table cannot be an operand or result of an SNMP operation. Thus, the maximum access for the two object-type constructs defining a table is not-accessible. Because a table is defined by two object definitions, the table editor window shown by Figure 14 has two Object Definition groups, named Table and Entry.
By convention the name for the table object definition ends with “Table” and the name for the entry (row) object ends with “Entry”.
The description property of the table object should describe the information in the table or its usage as well as estimations on the maximum number of rows and any objects whose values are associated with the table.
The description property of the entry (row) object should document whether rows can be created or deleted via SNMP operations, and if so, then what is required for this to happen. It should supplement the description of the RowStatus object of such a table.
Index / Augments
The INDEX / AUGMENTS property specifies how rows are indexed in the table. The INDEX clause lists the ordered index items for a table. Typically, the index items are names of not-accessible columns in the table. If a table consists of index columns only, then the last index column has to be read-only. In addition, read-only index columns are allowed when porting SMIv1 MIB modules to SMIv2.
The AUGMENTS clause documents a special relationship between two tables. The item specified is the entry object of another table, the base table. For every row in the augmenting table there has to be exactly one corresponding row in the base table with the same index value.
The total length of all index-sub-identifiers plus the length of the OBJECT-TYPE’s OID must not exceed 128 sub-identifiers.
Implied Length of Last Index Object
This may be only specified for index objects whose base type is a varying length string (i.e., OCTET STRING and Opaque) or an object identifier.
The rows in a table are ordered by the value of the table’s indices. If an index object has a varying length string base type, its contribution to the index OID is built by n+1 sub-identifiers, where the first sub-identifier is the length of the string and each following sub-identifier is the ASCII value of the corresponding character of the string. If a string or an object identifier has a fixed length then sub-identifier denoting the length is omitted. This can be forced by checking the IMPLIED property for the last sub-index.
The index objects for the table can be easily chosen using a shuffle dialog which is opened by pressing the Choose button.
Sub-index values with IMPLIED length must have at least one sub-identifier.
Columns
The Columns group specifies the columns that are part of the table. In order to add (append) a column to the table, press the Add button below the columns overview table. A column may then be moved within the table by editing its OID. A column may be modified by selecting it and then pressing the Edit button. As usual, one or more columns may be removed from the table by selecting the appropriate row(s) in the columns table and then pressing the Remove button.
The NOTIFICATION-TYPE construct is used to specify the events that can be reported by an agent (i.e., a notification originator). The OID value assigned to a notification-type is sent with a notification in order to identify it. Figure 15 shows the notification-type editor window with its Object Definition and Objects group.
Objects
The optional OBJECTS clause can be used to specify one or more scalar or columnar objects whose values describe the event. Objects can be added and removed from the notification-type definition by pressing the Choose or the Remove button respectively. Alternatively, you may press Choose to open a shuffle dialog with which you can choose the objects that must be at least provided with a notification.
By clicking on the right table’s header of shuffle dialog you may sort the objects in ascending or descending order.
Figure 15:Notification-type editor window.
The OBJECT-GROUP and NOTIFICATION-GROUP constructs are used to define a collection of related object type definitions and notification type definitions respectively. Consequently, both editor windows are very similar. They consist of an Object Definition group and an Objects group.
Every object type with a value for the MAX-ACCESS clause other than “not-accessible” must be a member of at least one object group. A similar rule applies to notifications. Each notification type must be a member of at least one notification group.
Objects
The Objects group specifies one or more scalar or columnar objects that are related to each other. Objects can be added and removed by pressing the Choose or the Remove button respectively. The Choose button opens a shuffle dialog which can be used to add all or any subset of available objects to the group. Analogous to the objects editor of the NOTIFICATION-TYPE construct, objects may be sorted in ascending or descending alphabetical order.
Please note that the object types grouped through an OBJECT-GROUP should conform to the status clause of that object group definition.
The MODULE-COMPLIANCE construct is used to convey a minimum set of requirements with respect to implementation of one or more MIB modules. Besides the Object Definition group, the module compliance editor window (Figure 16) contains an Objects group which can be used to specify a list of MIB modules for which the module compliance statement defines requirements.
Modules
Specifies a non-empty list of MIB modules for which compliance requirements are being specified. Each MIB module is named by its module name which can be selected from a combo box, which is shown when clicking on a list item. The module name may be (left) blank to refer to the encompassing MIB module. The details of a compliance requirement can be edited by selecting the corresponding module name and then pressing the Edit button.
Figure 16:Module compliance editor window
The requirements for a compliant implementation of a module can then be edited with the dialog window shown by Figure 17.
Mandatory Groups
The Mandatory Groups clause specifies a possibly empty list of names of object or notification groups within the correspondent MIB module which are unconditionally mandatory for implementation.
Conditional Groups and Exceptions
Specifies a mix of the following two types of items:
1.Object and notification groups which are conditionally mandatory for compliance to the MIB module. In addition, unconditionally optional groups can be specified. In any case a group specified as being conditional must not be listed in the mandatory groups property at the same time.
2.MIB objects for which compliance has a refined requirement with respect to the MIB module definition. The refinement details for a list entry are shown in the Details group of the dialog window when the entry is selected (see Figure 17). The details can then be edited. The description property must be given. All other properties are optional and can be specified by checking the box on the right side of the property label. The required syntax and write-syntax are edited as described in section “Textual-Convention” on page 26.
Figure 17:Window for editing implementation requirements details.
The AGENT-CAPABILITIES construct is used to specify implementation characteristics of an SNMP agent sub-system with respect to object types and events.
Product-Release
The Product-Release field contains a textual description of the product release which includes this set of capabilities.
Supported Modules
The Supported Modules clause specifies a possibly empty list of MIB modules for which the agent claims a complete or partial implementation. Details about the implementation of a module can be edited by selecting it and then pressing the Edit button.
Figure 18:Agent-capabilities editor window
The details about a module implementation can be edited by using the dialog window shown by Figure 19.
Includes
The Includes field specifies a non-empty list of MIB groups associated with this supported MIB module which the agent claims to implement.
Variations
The Variations field specifies a possibly empty list of objects or notifications which the agent implements in some variant or refined fashion with respect to the correspondent OBJECT-TYPE or NOTIFICATION-TYPE definition. In order to edit the refinement details of such an object or notification, select the corresponding object name and details will be shown in the Details group where they can be modified too.

Figure 19:Supported module editor window.
5.2.21MIB-Tree Colors and Icons
The node label colors in the MIB tree have the following meaning:
4Black denotes a not-accessible or accessible-for-notify MIB object as well as textual conventions or type assignments.
4Gray denotes a read-only MIB object type.
4Light-Gray denotes any MIB object that is obsolete or deprecated.
4Blue denotes a read-write MIB object type.
4Red denotes a read-create MIB object type.
4Orange denotes a trap or notification type.
By checking the option “Use SMI object type specific tree icons” under Preferences>View, object type specific tree icons are displayed instead of the default tree icons of the used Look&Feel. The icons displayed represent the following SMI object types:
4 A SMIv2 MODULE-IDENTITY definition.
4 Scalar OBJECT-TYPE definition.
4 Tabular OBJECT-TYPE definition characterized by a SYNTAX clause using “SEQUENCE OF”.
4 Table entry OBJECT-TYPE definition that defines the INDEX and columns of a conceptual table row.
4 A columnar OBJECT-TYPE definition.
4 An SMIv2 OBJECT-IDENTITY definition.
4 A SMIv2 TEXTUAL-CONVENTION definition or SMIv1 type definition.
4 An OBJECT-GROUP definition.
4An SMIv2 NOTIFICATION-TYPE or a SMIv1 TRAP-TYPE definition.
4 A NOTIFICATION-GROUP definition.
4 A MODULE-COMPLIANCE definition.
4 An AGENT-CAPABILITIES definition.
MIB Designer contains a built-in spell checker that is available for any text input field within the object editors. The spell checker contains an American English main lexicon containing more than 100,000 words as well as a British English main lexicon also containing more than 100,000 words. Besides these lexicons, a user dictionary may be specified within the Edit>Preferences… ( ) dialog, that can be used by a MIB author to extend the above dictionaries.
Text input fields are background checked and misspelled words are marked by a dashed red underline. By pressing the right mouse button over a (misspelled) word, a context provides a selection of up to ten correction suggestions. In addition, if a user dictionary has been specified, the selected word can be added to the user dictionary or ignored always.
The spell checker dialog can be invoked wherever the label for a text input field is a button (see also “Moving Objects” on page 19). By holding down the <Ctrl> key when pressing the label button, the spell checking for the text in the text input field is started. If the spell checking encounters an error the window shown by Figure 20 will pop up. It allows ignoring, replacing, changing, or learning the word in question.
By just pressing the label button, a text editor window can be opened that provides a more convenient way to edit extensive texts. In addition, that window has a button to start spell checking as well.
If the Add button is insensitive then the file for the user dictionary has not yet been specified within the preferences dialog.
Figure 20:Spell checking dialog.
MIB Designer uses Perl 5 regular expressions which are described in the documentation of the GNU regular expression library documentation that is distributed with MIB Designer.
MIB Designer has the capability of searching the current MIB module or the whole MIB repository by a given regular expression. The search dialog shown by “Finding MIB Objects” on page 38 is accessed by choosing Edit>Find from the main menu ( ), which will search the current MIB module or by choosing Edit>Search MIB Repository (see “Search MIB Repository for Importing Objects” on page 39), which will search the whole MIB repository.

Finding a MIB object.
Objects are searched by matching the given regular expression with the objects’ attributes that have been checked. By checking All, the whole SMI text, including key words, shown in a node’s preview is matched against the given regular expression.
When using the Edit>Find… menu or  button the MIB tree is searched from its root until the first matching node is found. The next matching node can then be found by using the Edit>Find Again menu or
  button. Please note that Find Again always starts searching at the currently selected node in depth first order.
The incremental search panel in the tool bar provides the same search capabilities with a quick access. In addition, previous and next matches can be accessed using the Up and Down arrow of the incremental search tool bar.
5.4.1Search MIB Repository for Importing Objects
By searching the MIB repository using Edit>Search MIB Repository the search results will be displayed in a table. Each row in the table represents a MIB object that matched the given search criteria. By selecting one or more rows and then pressing the Import Selected button, those objects are added to the IMPORTS clause of the currently edited MIB module. If an object is already imported by the current module, a warning message will be displayed. If an object is a TRAP-TYPE or NOTIFICATION-TYPE an error message will be displayed, since those objects cannot be imported by a MIB module.
In addition to the search options available by the Find MIB Object dialog shown by “MIB repository selection dialog” on page 6, the search dialog for the searching the MIB Repository provides the search option Imports which allows to search import references. This option searches references in IMPORT, MODULE-COMPLUANCE, and AGENT-CAPABILITIES clauses that match the specified search pattern. To narrow the search results to references of a certain set of MIB modules, a search pattern for MIB module names followed by a colon (‘:’) may be prepended.
5.4.2Search MIB Repository for References
To avoid inconsistencies when editing a set of MIB modules, it is often useful to be able to search for references to a MIB object in other MIB modules. MIB Designer provides this feature through the menu item Search References in the context menu of a MIB object.
The MIB modules in the MIB repository are searched for any references (by IMPORT clauses) to the selected MIB object. All matched MIB modules and the referring objects are listed in the displayed search result dialog. By selecting one or more list items, the corresponding MIB modules can be opened for editing.
5.4.3Navigate Between MIB Objects
An easy navigation between the recently visited MIB objects is provided through the Forward ( ) and Back (
 ) buttons on the tool bar as well as the corresponding menu items in the View menu.
To navigate to the adjacent MIB objects of a selected node, the “Show object navigation links” option from the View preferences can be used. When activated, this option displays navigation links within the SMI preview window. The object links are displayed as ASN.1 comments and the underlined object names of the adjacent objects can be clicked.
5.4.4Refactor Object Names and Descriptions
When the name of an organization or product changes, it can be necessary to change the object names of a sub-tree when creating a new MIB module for the new organization or product that should include the old objects with new names for backward compatibility.
The Search and Replace function of MIB Designer can be used to replace object names and/or descriptions by a regular expression.
Do not change OIDs of released MIB objects as this would violate SMI rules and break existing applications.
To search and replace object names and/or descriptions in a sub-tree of a MIB module, select the root of the sub-tree in the MIB tree and then choose Edit->Replace ( ) menu. A dialog that is similar to the search dialog shown by Figure 21 is displayed. The search option for OIDs is disabled, because it is better (and easier) to change OIDs by rearranging sub-trees with Copy & Paste, Drag & Drop, or changing a sub-tree OID by editing a MIB object.
Enter the search expression in the search field and the replacement expression or string into the replace field. The replace expression may contain regular expression group references ($1, $2 etc.) to include parts of the matching string into the replacement string.
For each match found, you will be asked whether it should be replaced or skipped. When an object is locked, because it has already been released, it will not be included in the search result. If you choose to replace all occurrences you can undo (and redo) all replacements at once. Otherwise undo is available step by step.
A MIB module can be checked for errors at any time by choosing View>Check from the main menu ( ). If the current MIB has any errors then they will be shown in the errors table below the SMI preview and the MIB object containing the first (selected) error is selected in the MIB tree. The error location is then highlighted in the node’s SMI preview.
The current MIB module can be saved by choosing File>Save from the main menu ( ), which saves the module into the current MIB repository. The MIB is not checked for errors.
In order to be able to use a MIB outside MIB Designer, it is necessary to export it as a text file. This is done by choosing File>Export as… from the main menu (alternatively:  ). You will be prompted for a file name which could be every valid file name on the used operating system, however, a default name is provided for convenience.
The preview function of MIB Designer (View>Preview, <Ctrl-P>,  ) not only provides a preview of the whole SMI definition of the current MIB module, further more, it can be used to export it to HTML. Figure 22, for example, shows a detail of the preview for the ATM-MIB.

Figure 22:Example SMI preview (ATM MIB).
5.6.1Exporting MIBs to XML, HTML, XSD, PDF, and Text
MIB modules can be exported from the MIB repository as XML, XML Schema (XSD), HTML, PDF, or plain text files. The text colors that can be set for printing (see “Printing a MIB module” on page 42) and syntax highlighting of the MIB file editor apply also to the PDF export function.
To export a set of MIB modules:
1.Choose Export MIBs from the File menu.
2.Choose the file format for the exported MIB modules.
3.Select the MIBs to export from the list of available modules and press the Add button to add them to the list of modules to be exported.
Note: Any files that already exist in the destination directory might be overwritten without warning!
4.Choose the destination directory.
5.Press OK to start the export operation. Each MIB module will be exported to a file, whose name will be the MIB modules name concatenated with one of the suffixes .txt, .html, .xml, .xsd or .pdf.
6.When exporting to PDF, you will be now prompted by an additional dialog for page layout and other document settings. You can choose the page size, footer, outline structure and font size. Press OK to export the selected MIBs with the selected settings.
The current MIB module can be printed with syntax highlighting by choosing Print from the File menu. The operating systems print dialog will be opened, where printer and pages to be printed can be specified. The MIB file is printed black-and-white with header, footer, and line numbers by default. To change these settings go to the MIB Designer preferences dialog and select the Printing tab.
The current MIB module can be edited as a text file by choosing MIB File Editor from the Edit menu. The MIB File Editor is opened (see Figure ). The editor has the usual capabilities of a text editor including undo and redo. In addition it has four special features that are explained in the following paragraphs.
By choosing Check (SMI Standard) from the File menu the MIB file is checked for syntax errors that violate the SMIv1 or SMIv2 standard respectively. The file is not saved automatically while it is checked. In case syntax errors have been found they are displayed in the error list.
By choosing Check (Leniently) from the File menu the MIB file is checked for fundamental syntax errors. The file is not saved automatically while it is checked. In case syntax errors have been found they are displayed in the error list.
5.8.2Saving and Compiling a MIB File
By choosing Import MIB ( ) from the editor’s File menu the edited file is saved and compiled. If compilation fails, then the contained MIB module will not be imported into MIB Designer. Instead an error text will be displayed in the text area below the editor’s tool bar. On successful compilation, the MIB module will be stored in the MIB repository and loaded. At the same time the editor window will be closed.
The default above method to import a MIB uses the syntax checking that is configured in MIB Designer preferences. In order to use a specific level of syntax checking, i.e. either the SMI standard check or a lenient syntax check.
In order to import a MIB file with SMI standard syntax checking, use the green import icon ( ) or the corresponding menu item in the File menu.
In order to import a MIB file with lenient syntax checking, use the yellow import icon ( ) or the corresponding menu item in the File menu.
The syntax completion works similar to the code completion features of many Java or C++ IDEs. By pressing <Ctrl>-<Space> at any position in the edited text, MIB Designer shows possible replacements for the token under to cursor.
If there is only a single possible replacement then the text under the cursor will be replaced with it. If that is not what you wanted you need to press <Ctrl>-Z to undo the operation. Otherwise, the possible completions will be displayed in a popup dialog. An entry can be applied by double clicking on it or pressing <Enter>.
Note: The shown completion alternatives are based on syntax analysis only. Semantically, some of those alternatives may not make any sense. This will be, however, reported by the validation checks which need to be run manually. See “MIB Validation” on page 40.
The completion alternatives are listed in alphabetically ordered. You can jump within the list by typing the first letter of the entry you search. From the possible replacements listed below only those are displayed that would syntactically fit at the cursor position:
4SMI tokens like DESCRIPTION, SYNTAX, read-write, etc.
4Lowercase names of the MIB module edited
4Uppercase names of the MIB module edited
40 as placeholder for a positive number including zero
41 as placeholder for a positive number excluding zero
4’’b as placeholder for a binary string constant
4’’h as placeholder for a hexadecimal string constant
4“255d“ as placeholder for an OCTET STRING DISPLAY-HINT format definition
4“d” as placeholder for an DISPLAY-HINT format specification of a numeric SMI variable.
4“ “ as placeholder for a character string constant.
4"YYYYMMDDhhmmZ" representing the current date and time in ExtUTCTime format. See “Last-Updated” on page 25.
If the contents of the edited MIB file cannot be analyzed, lower- and upper case names cannot be listed. Instead, the placeholders lowerCaseName and UpperCaseName are displayed.
5.8.4Printing with Syntax Highlighting
To print the MIB file loaded into the MIB File Editor, choose Print ( ) from the editor’s File menu. See also section “Exporting MIBs to XML, HTML, XSD, PDF, and Text” on page 41.
5.8.5Search and Replace by Regular Expressions
A powerful way to make modifications to a MIB file is searching and replacing by regular expression. Section “Regular Expression Syntax” on page 89 gives a brief description of regular expression syntax.
To search a MIB file by a regular expression, choose Find ( ) from the Edit menu. Enter the expression to search for in the opened dialog. The combo box will remember ten expressions used last.
To search and replace found matches, choose Replace ( ) from the Edit menu. Enter the search expression and the substitution expression and press OK. A matched region in the MIB file will be selected and a confirmation dialog will be shown. Each substitution can be confirmed individually or all substitutions can be confirmed at once.
The substitution string may contain variable interpolations referring to the saved parenthesized groups of the search pattern. A variable interpolation is denoted by $1, or $2, or $3, etc. It is easiest to explain what an interpolated variable does by giving an example:
Suppose you have the pattern b\d+: and you want to substitute the b's for a's and the colon for a dash in parts of your input matching the pattern. You can do this by changing the pattern to b(\d+): and using the substitution expression a$1-. When a substitution is made, the $1 means "Substitute whatever was matched by the first saved group of the matching pattern." An input of b123: after substitution would yield a result of a123-.
Many common errors in MIB files can be corrected by using the RE search and replace function. Here are three examples:
1.INTEGER may only be used for enumerations in SMIv2. To replace INTEGER by Integer32 for other definitions use:
Search Expression: (\s+)INTEGER(\s+)(?!\{)
Substitution Expression:
$1Integer32$2
2.Within SEQUENCE constructs sub typing (i.e. range or size restriction) is not allowed. To delete such sub typing in SEQEUNCE constructs use (enter search expression as single line without spaces):
Search Expression:
(\n\s*[a-z][a-zA-Z0-9]*\s*\n*\s+
[A-Z][a-zA-Z0-9]*\s*[A-Z]*)\s*\(\s*
((\d+.*)|(SIZE\s*\(.*\)))\)
Substitution Expression:
$1
3.The under bar “_” character is not allowed in enumeration labels. To delete the “_” and change the following letter to uppercase use:
Search Expression:
([a-z][a-zA-Z0-9]*)_([a-zA-Z0-9]+\s*\(\d+\))
Substitution Expression:
$1\u$2
1. The inline ASN.1 comment is only available for MIB objects with an object identifier assignment.