The set of information that describes where and how to send a SNMP message is called a 'Target' and consists of three kinds of information:
Destination information, consisting of the network transport protocol, an IP address or host name, and the port.
Message processing parameters, consisting of timeout value, number of retries, and SNMP version (message processing model).
SNMP parameters, consisting of security model (community based or USM), security level, and security name information. For SNMPv3 targets there are additional parameters like engine ID, context, and context engine ID which may be optionally configured.
Targets may be configured for the following purposes:
1.To manage a SNMP agent or proxy agent (also known as command responder).
These targets have typically a host IP address and the default SNMP port 161.
2.To send traps/notifications or Inform requests to a trap receiver application (also known as command generator).
These targets have typically a host IP address and the SNMP trap port 162.
3.To discover SNMP agents in a (sub) network.
These targets may have a broadcast IP address.
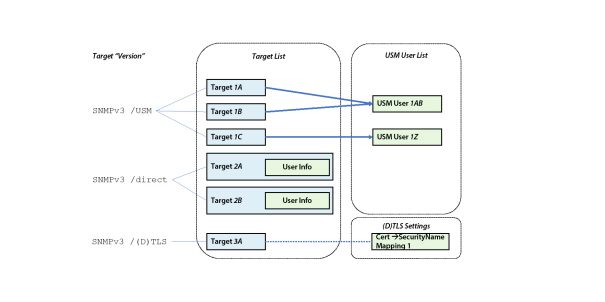
Since version 5.0, MIB Explorer allows to define SNMPv3 targets using user based security (USM) in two ways:
User and Target are independently specified and target uses such an USM user by reference
Target directly defines any necessary SNMPv3 user information like security name and protocols and (localized) keys. Using this new definition type, targets are fully independent and can be easier maintained because passphrase (and resulting key) changes do not need to be executed concurrently on all associated targets.
SNMPv3 /(D)TLS
With DTLS or TLS targets no user information are exchanged over the wire - even no security name. To be able to associate View Based Security Model access restrictions to such SNMP operations, the notion of a security name is essential.
Thus, certificates, host-names, fingerprints etc. can be used to map from a certificate/peer to a SNMPv3 security name. This mapping is done independently from any particular target as described by (D)TLS Security Name Mapping.
Figure Three ways to define a SNMPv3 target using different Version options. illustrates which of the three different target types relate to the USM User list (SNMPv3 /USM only) and why the new types SNMPv3 /direct and SNMPv3 /(D)TKS do not need/has any relation to it.
Targets are configured by using target and optionally user editor. The target configuration therefore consists of two tabs with two tables. The first table is used to configure targets including direct user information and the other is used to configure USM users.
Users in the USM user list may have two possible usages:
1.Provide centrally SNMPv3 USM user credentials for target configurations (with version “SNMPv3 /USM”).
2.Define a USM user without localized passkeys as “principal” to allow MIB Explorer to localize its passphrases when receiving in incoming authenticated notification through its.
Both tables (Targets and USM Users) can be sorted by arbitrary columns by clicking on the column headers.
By setting a master password with Edit->Master Password all passphrases and community names of the target and user configuration as well as the keystore passwords of the TLS transport are stored AES 128 encrypted in the configuration file within the users home directory.
To Edit Targets:
1.Choose Targets from the Edit menu or  from the tool bar.
2.Edit the targets as described by Adding a New Target and Removing a Target.
3.Save your changes by pressing Apply or OK. OK closes the dialog after applying the changes.
8.2Selecting the Active Target
To select the target you want to work with:
1.Select the target from the combo-box in the Targets tool bar.
2.Open the Targets editor by choosing Edit->Targets, select the target you want to use, and then choose Set Active from the context menu or select the check-box in the first column named "Active".
Although targets may be used for different purposes, they are created in the same way. Only the used address/port distinguishes between agent, trap, or discovery targets.
The target tab is divided into a upper and lower pane where the upper contains the list of all configured targets and the lower pane provides a form to edit the selected target.
Tip: The name column of the table is not editable and can be therefore used to easily select a row.
A changed form value is applied to the table whenever the focus is moved from the edited field. If a value is not valid, the field background will change to pink and the table value is not updated until the value has been corrected.
To Add a New Target:
1.From the Edit menu choose Targets ( ). A modal dialog will be shown.
2.Choose the Targets tab.
3.Press the New Target button.
4.A new row will be inserted into the target configuration table and the target name editor is activated. You can now edit the entry using the form on the lower half of the split pane.
5.Enter an unique name for the target.
6.Select the transport mapping (UDP, TCP, TLS, or DTLS) with which the target can be accessed from the Transport column. Which target Version is available, depends on the transport mapping selection. Version SNMPv3 (D)TLS is available with TLS and DTLS only, but not with any other transport mapping.
7.Enter the IP address and port of the target separated by a slash (/). You can also enter a host-name if the target uses Dynamic Host Configuration Protocol (DHCP) to determine its IP address. To access the SNMP of your local system, enter 127.0.0.1/161, 127.0.0.1, localhost/161, or localhost.
Additional examples are:
switch01:1161 - Switch on non-standard port 1161
92.168.0.1:162 - A trap target using standard trap port 162
255.255.255.255 - Discovery target using an IPv4 broadcast address - works with UDP only.
92.168.0.255:4700 - Discovery target for port 4700 in class C network 192.168.0
080::8:800:200C:417A - An IPv6 address.
FFFF:129.144.52.38/161 - An standard IPv4 address in IPv6 format.
8.Select the SNMP version for the target:
SNMPv1
Community based weak security
No GETBULK
SNMPv2c
Community based weak security
SNMPv3 /direct
Strong security using SNMPv3 user information directly embedded within the target configuration. Only localized keys are stored - no plain text passwords.
SNMPv3 /USM
SNMPv3 user credentials are not included in target configuration. Instead they are references by name from the MIB Explorer’s USM.
Use this version, to manage multiple targets with the same credentials - requires using synchronous multi-target USM key changes!
SNMPv3 /(D)TLS
Mandatory with DTLS or TLS targets.
No security information in the target configuration, instead security name and trusted certificates are configured in the (D)TLS Security preferences.
9.Choose the Timeout value and the number of Retries.
10.Choose the MIB set you want to associate with the target from the drop down list. Select the empty entry, if you do not want to associate any MIB set with the target.
11.If you have chosen SNMPv1 or SNMPv2c as SNMP version then enter the community to be used with the target.
12.Otherwise, if you have chosen SNMPv3 /USM then select an USM user from the drop-down list. If you need to add a new user then create it using New User.
13.Otherwise, if you have chosen SNMPv3 /direct then configure the embedded user credentials as described in
14.You can continue to specify the optional SNMPv3 security parameters engine ID, context name, and context engine ID as described below.
15.Save the new target into MIB Explorer's configuration by pressing OK.
To Configure Optional SNMPv3 Security Parameters:
1.Use the Engine ID label button to discover the targets Engine ID. Leaving the engine ID field empty will let MIB Explorer discover the target's engine ID automatically, once for each session.
2.Enter the Context to be used with the target as plain text. The default is an empty string.
3.Enter the Context Engine ID which selects the subsystem or proxy as a plain text or hexadecimal string, for example 0f:ab:12:A:g5 (use the context menu Format to change the input format). The default is an empty string. In this case, MIB Explorer will use the entered or discovered engine ID as context engine ID.
|
|
To Configure Embedded User Credentials:
1.Enter security name.
2.Select authentication protocol - or leave it empty if security is not needed.
3.Select privacy protocol - or leave it empty if security is not needed.
If there was already a key in the corresponding embedded user field, then its content will be shown here in the pass-phrase field as hexadecimal (HEX) representation. Then select the format “__” to clear the existing key and switch to the text (TXT) format immediately.
4.If you have chosen an authentication protocol:
Click on the Authentication Key label and a dialog will be shown to enter a clear text password in the Passphrase field.
5.Click on Localize to compute and preview the Localized Key (use the Show Secrets checkbox to actually show key and password on the screen).
6.Press OK to save the computed localized key into the corresponding key field of the target’s embedded user configuration.
7.Repeat steps 4-6 for the privacy key.
The only difference is here, that now authentication and privacy protocol have to by set in the localization dialog.
1.From the Edit menu choose Targets ( ). A modal dialog will be shown.
2.Choose the Targets tab.
3.Select the target to delete from the by clicking on it (using the Name column).
Removing a target will not invalidate monitor configurations using that target, however the removed target will no longer available for the discovery configuration after restarting MIB Explorer.
4.Press the Delete Target button.
5.Select a target you want to work with and choose Set Active from the context menu or select the corresponding check-box in the column Active.
6.Press Apply or OK button. OK closes the dialog after applying the changes.
A SNMPv1/SNMPv2c community typically consists of at least one agent and one or more managers. A community is named by a string of octets which is called a community string. Although many SNMP developers and users believe that a community string is a password, its originally intended use was not that simple. Nevertheless, many agent implementations are using a community string as password for read-only access and another for read-write access.
Community strings are send as plain text over the wire.
With MIB Explorer you can specify a single community for each target that is used for all request types. But of course, you may define more than one target definitions for the same agent (i.e., command responder application).
The User based Security Model (USM) associates a user name with security information and is defined in RFC 2574. A USM user consists of:
User Name
An internal name for the user. In most cases this name would match the security name. The user name must be unique within a MIB Explorer configuration.
Security Name
Identifies the user. The security name is used to refer to an user in many MIBs, in particular the SNMP-VIEW-BASED-ACM-MIB maps security model/name combinations to groups in the VACM. Without such a mapping a USM user cannot access any MIB information in an agent.
Authentication Protocol
Determines the authentication protocol to be used for this user:
no authentication
MD5, SHA-1 (deprecated, because safer protocols with SHA-2 are available now)
SHA-2 algorithms:
SHA-224
SHA-256
SHA-384
SHA-512
Authentication Passphrase
If an authentication protocol is selected, an authentication passphrase has to be entered too. That will be combined with the target's SNMP engine ID to form the localized authentication key by using the selected hashing algorithm.
Instead providing the passphrase, you can also directly compute the localized key and enter it (see below).
If you do not provide a Localization Engine ID, which is recommended here for an USM user, then the target's engine ID will be used to localize passphrases on-the-fly. The USM user can thus be used securely for several SNMP targets.
If you provide a Localization Engine ID then this user can only be used with a target whose authoritative engine ID equals the used localization engine ID.
To enter a passphrase in hexadecimal format, use the format button on the right of the input field.
Privacy Protocol
Determines which privacy protocol to be used for this user:
no privacy
DES, 3DES
AES128, AES196, or AES256 is used with this user.
Note: As long as you use SHA-256 or higher, key extension is not needed and both AES implementations are compatible on the wire.
The nonstandard privacy protocols AES192-KeyExt3DES and AES256-KeyExt3DES are provided to ensure interoperability with some devices that implemented AES 192 and 256 privacy with a key extension algorithm specified for 3DES. Although, that combination was never specified by an IETF RFC or draft, it has been implemented by some manufactures and is necessary for interoperability if using inappropriate authentication algorithms that produce too short keys for those AES types.
Privacy Passphrase
If the privacy protocol DES is selected then the entered privacy passphrase is localized with the selected authentication protocol (analogous to localizing an authentication passphrase) and then used to encrypt/decrypt SNMP messages.
Localization Engine ID
The localization engine ID can be left empty by default. However, if two targets use the same security name with different passphrases and/or authentication/privacy protocols then you need to localize each user for its specific engine ID to avoid clashes. You can localize the passphrases of an user easily by using Localize User from the context menu. It prompts for the target engine ID used for the localization in hexadecimal format. Once you press OK, the passphrases are localized and the entered localization engine ID is stored with the USM user security credentials.
MIB Explorer abstracts from security names by using User Profiles. The User Profile Name is independent from the user's security name. Nevertheless, it makes sense to choose the profile name according to an user's security name for better readability.
Please note that adding a new user to MIB Explorer's configuration does not create that user in the USM MIB of the target for which you added the user. To create a new user in the USM MIB of one or more targets, use the SNMPv3 user administration (SNMPv3 User Administration).
To Add a USM User Profile:
1.Select Targets from the Edit menu.
2.Press the Add User button from the tool bar. The USM User tab will be shown and a new row at the bottom of the table will be inserted. The user name editor in the form in the bottom split view is then activate to enter the name of the new USM user profile.
3.Enter a unique name for the user profile. If possible, the profile name should be equal to the security name of the user.
4.Enter the properties of the USM user (USM Users).
5.Press the Save button.
A user profile can be deleted from MIB Explorer's configuration if there is not any target using that profile any more. Otherwise a different user has to be selected for those targets first. Deleting a user profile does not delete the corresponding USM user in the SNMP agent associated with the target. In order to delete a user from the USM MIB of an agent use the SNMP Tables function on the usmUserTable MIB object.
To Remove a User Profile:
1.From the Edit menu choose Targets ( ). A modal dialog will be shown.
2.Choose the USM Users tab.
3.Select the user profile to be deleted.
4.Press the Remove User button to delete the profile. If other targets are also referencing that user the button is disabled and the user cannot be deleted.
5.Press the Apply or OK button to finally commit your change.
In target selection tool bar there is a button named Statistics. It opens a dialog which displays a sortable read-only table that provides for each target address/port combination statistics about the number of messages totally sent to the SNMP entity, as well as the number of messages needed per request (one is optimal here). In addition, the number of retries needed to fulfill the request as well as the runtime of the successful message exchange is counted.
The columns of the target statistics table are described in the below table:
|
Column |
Description |
|---|---|
|
Address |
The IP address and port of the target that was subject to SNMP requests that expected a response PDU. |
|
PDU Size |
Classifies the PDU size in number of variable bindings in the received response. The value * represents any PDU size. Otherwise the PDU size range is provided, whereas he lower bound is inclusive and the upper is exclusive. |
|
Total Messages Sent |
The total number of confirmed messages sent to this target since the last start of the application. |
|
Sent/Request MIN |
The minimum number of messages sent per confirmed SNMPv3 request. SNMPv1/v2c messages are not counted. |
|
Sent/Request MAX |
The maximum number of messages sent per confirmed SNMPv3 request. SNMPv1/v2c messages are not counted. |
|
Sent/Request AVG |
The average number of messages sent per confirmed SNMPv3 request. SNMPv1/v2c messages are not counted. |
|
Retries MIN |
The minimum number of retries that where needed to receive a response for a SNMPv3 confirmed request. Note: More retry messages could have been actually sent than this value indicates. |
|
Retries MAX |
The maximum number of retries that where needed to receive a response for a SNMPv3 confirmed request. Note: More retry messages could have been actually sent than this value indicates. |
|
Retries AVG |
The average number of retries that where needed to receive a response for a SNMPv3 confirmed request. Note: More retry messages could have been actually sent than this value indicates. |
|
Runtime MIN |
The minimum number of milliseconds elapsed between sending the request message (initial request or retry) and receiving the corresponding response PDU (SNMPv3 only). |
|
Runtime MAX |
The maximum number of milliseconds elapsed between sending the request message (initial request or retry) and receiving the corresponding response PDU (SNMPv3 only). |
|
Runtime AVG |
The average number of milliseconds elapsed between sending the request message (initial request or retry) and receiving the corresponding response PDU (SNMPv3 only). |